Einscan-SP 3D Scanner [Review]
We seasoned digital craftspeople can take an idea from a digital model to a physical concept with lightning speed. Unfortunately, that process seems
For example, when I get an existing item, already designed with complex molded shapes, that I want to add to my 3D assembly, I can crudely and laboriously try to reverse engineer it–tracing curves, making guesses, and using a complex trial and error duplicating system.
But you know what? It feels harder to replicate a shape than it was for the designer to create it initially. So, designers give up and model a basic chunk that approximates the actual item.
However, having an accurate model allows your design to conform to the item as something created to look and function as
How to solve this woe? And turn it into a Whoa!? I heard tales of an affordable 3D scanner that was getting really good reviews.
Shhhhhhhushing 3D
I listened softly to the whispers in the wind.
Einssssssssscan
I decided to leverage my influencer status and email Shining 3D, creator of the EinScan-SP 3D Scanner, to see if they would lend me a unit to experiment with. “My name is Dan Slaski with SolidSmack and I’m interested in doing a review…” translation “gimme gimme gimme”. And they did!

The Einscan SP by Shining 3D
The Basics
The EinScan-SP 3D scanner uses a foundational technology called structured-light to help capture the object. There are other foundational technologies behind commercially available scanners but, as FDM is to 3D printers, structured-light is the primary workhorse for 3D scanner technology.
Basically, sequenced light beams are projected on the object being scanned (the “
There are inherent limitations to scanning shiny, transparent, or dark surfaces as the projected light gets reflected, absorbed, or transmitted away from the cameras. Additionally, for a surface section to be captured the cameras must be able to “see” the section. If a surface is blocked by another surface relative to the cameras it won’t get picked up on that “snap”.
The blocked surface (or surfaces) are in the shadow of the surface in the forefront. The approach for creating a complete scan is to take many individual view scans (snaps) and combine them. This is the approach both for scanning completely around an object and for getting behind blocked views.
This is where the provided turntable comes in super handy for automating the scanning process. The turntable’s rotation increments can be set from 8 to 160. More detailed objects with more nooks and crannies require more increments, take more time, and increase the file size.
Imagine you are trying to get a full view of something larger than yourself, like a car. You would walk around the car and take a bunch of mental snapshots to form an overall mental picture of the vehicle. At auto
The EinScan’s ability to
Some objects simply aren’t well suited for scanning because of their geometry, such as objects with long, skinny holes or curve wells, narrow caverns, and items with a cage-like external structure or mesh structures. If you can’t get a good view of a surface with the human eye or every view is largely obstructed it probably won’t come out well. Tubas, slinkies, live porcupines, Moroccan lanterns, crazy straws, the souless gaze of a cat, and chainmail will prove difficult to scan fully.
EinScan Pro Tip #1:
Nolight, better scan
If the EinScan was a classic monster it would be Dracula. It has a sleek and ethereal turntable stand, velvet calibration pouch, and it hates the light!!! It’s true, for the best scan results, minimize exposure to ambient light. Perform scans in a dark environment like a windowless room with lights off or use a light blocking cover.
Unboxing and First Impressions
The EinScan-SP comes in a sharp looking box with custom inserts. Some people say, “don’t judge a book by its cover” and to
Expertise and resources were put into the packaging and design, and it shows. It looks like a very respectable consumer product. Why is this important? Because often new technology products are really science projects where the mechanics were designed by electrical engineers (or worse, software engineers) and time runs out and things get thrown in boxes.
The scanner/turntable setup is boringly straightforward. A power cable and a USB cable connects to the computer and an additional USB cable connects the scan head to the turntable when in use–No tools (or really instructions) required.
It is worth noting that this is the second generation of this product line and a significant update with a strong focus on streamlining the physical design and usability. Additional items such as a USB drive, small tripod, stickers, and calibration square are also provided. If you aren’t a L

Getting Started
1. Get Installin’
First, install the EinScan-SP software from the provide USB or the EinScan webpage. It requires a powerful computer to handle all the point clouds and meshing. My computer has an Intel i5-7440HQ and 2.80Ghz and worked hunky-dory.
| Items | Recommended PC Config |
| Operating System | Windows 7, 8, 10 (64-bit) |
| Ports | 1x USB 2.0/3.0 minimum |
| RAM | 16 GB minimum |
| Graphics Card | NVIDIA GTX-series or better |
| Graphics Card Memory | 2 GB minimum |
| CPU | Intel® Core™ or better |
2. Get Calibratin’
Set the calibration board in the stand, on the turntable, and center it visually on your screen in the patterned orientation indicated by the software.


The calibration board does a pirouette on the turntable and the software does its thing, notifying you when it’s complete. Rotate the board counterclockwise 90 degrees and repeat. One more time, et voila, calibration complete. I followed the instructions but wasn’t particularly deliberate or careful, and always passed with flying colors.
3. Get Scannin’
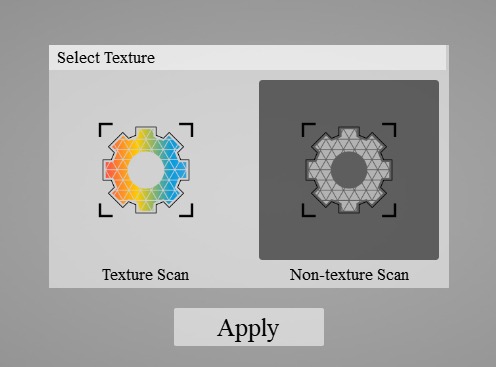
You are given the option of color (Texture Scan) or non-colored (Non-texture scan). I’m only going to cover the non-colored scan for the purpose of gathering geometric data for design.
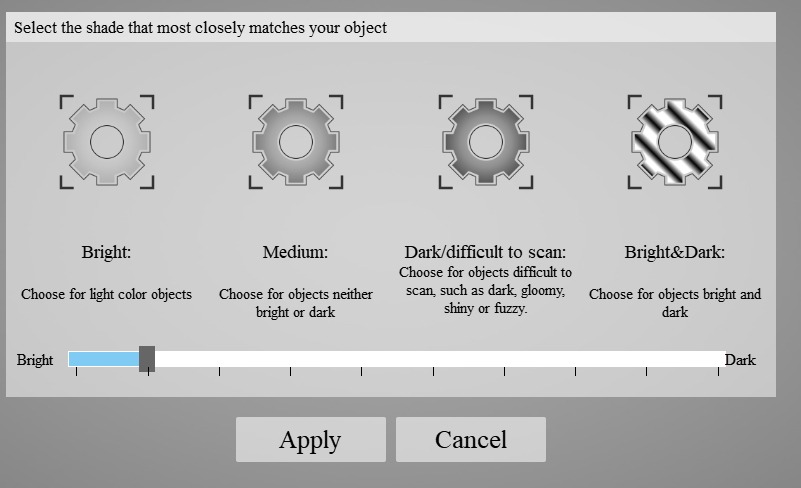
Next, select the appropriate brightness scan setting based on the color(s) and finish of the

Light color surfaces are robust and scan easily, difficult to scan items will require some trial and error settings adjustment, if you are scanning “gloomy” items, go watch kitten videos instead.
EinScan Pro Tip #2:
Dull the Scan Surface
Spraying your
EinScan Pro Tip #3:
Start Simple
It’s very tempting to jump right in with the complex thing you ultimately want to scan (like I did). I recommend starting with a super simple scan–a small blob with smooth, light-colored surfaces like a rubber duck or peeled potato. It would be nice if a simple item for scanning came with the scanner so users could jump right in and as a standardized barometer for troubleshooting online (Benchy the tugboat, for example). A successful simple first scan validates the setup and allows for tweaking some of the software parameters to develop an understanding of their relative significance and importance.
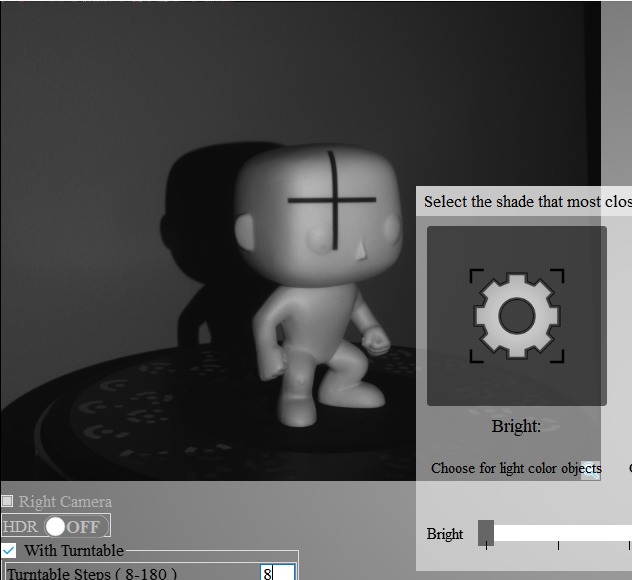
Project 1: Blank Funko POP
Project 1: Scan Settings
- Environment: Dark basement
- Music Playing: Greta Van Fleet
- Brightness Adjust: Bright
- Align Mode: Turntable
- Scan Set 1 – Feet: 8 Steps
- Scan Set 2 – Back: 8 Steps
- Scan Set 3 – Stomach: 8 Steps
EinScan-SP Results
SUCCESS! The whole process took 5 to 10 minutes and produced impressive results. To get a sense of the resolution, the manufacturing imperfections, and the markings on the feet are copied. If I tried to reverse engineer this dude using my previous toolset, with any accuracy, it would have resulted in #Fail.
Project 2: PEZ Flamingo

Moving right along to a more intricate object with undercuts, surface textures and some dark colored portions. It’s a flamingo PEZ dispenser named Floyd (get it? Pink Floyd). Seriously? Yes, you’re welcome.
Project 2: Scan Settings
- Environment: Dark basement
- Music Playing: Sylvan Esso
- Brightness Adjust: Medium
- Align Mode: Turntable
- Scan Set 1 – Standing: 16 Steps
- Scan Set 2 – Side 1: 8 Steps
- Scan Set 3 – Side 2: 8 Steps
Project 2: Results
All and all the results came out very good. It didn’t get deep inside the flamingo’s butt, as you would expect. It also didn’t pick up the shiny black beak. The strategy was to do a high volume of snaps in the upright position to get into the undercuts and then a light volume of snaps on the sides to fill in the top and bottom. The colored scanning was just as a fun experiment. And now, thanks to fine people at PEZ CANDY, INC. and myself the world is a better place.
Project 3: Stress Test – PVC Pipe Fitting With Internal Threads

It’s time to put this baby to the test. It was all fun and games up to now. How would it handle… internal threads (gasp).
EinScan Pro Tip #4:
Use Black Clay to Adjust
Black modeling clay makes great as a fixturing tool. Clay conforms to your
Project 3: Scan Settings
- Environment: Dark basement
- Music Playing: Robyn
- Brightness Adjust: Bright
- Align Mode: Turntable
- Scan Set 1 – Side A: 50 Steps
- Scan Set 2 – Side A + 22.5°: 50 Steps
- Scan Set 3 – Side A + 45°: 50 Steps
- Scan Set 4 – Upright: 16 Steps
Project 3: Results
#AwesomeSauce. Getting the settings dialed in drew on the expertise I had gained from the previous scans and took a little experimentation. Putting the fitting on its side and using a dense rotation increment ensured a couple of the rotational snaps would have a good view into the threads. This project was more involved from both the number of orientations and snaps per orientation. But at the end of the day it totally worked!
Deep Thoughts
By Dan Slaski
It’s hard not to use a 3D printer as the baseline of comparison for digital design tools. A commercial/prosumer printer should be able to be set up by someone with no previous experience and provide all requisite material and knowledge for a validation print right off the bat. After that, projects can get infinitely more complex by experimenting with materials, inserts, complex geometries, and on and on.
3D printing does have significant limitations, that once understood, can be worked with and around to design in amazing new ways not previously feasible.
Similarly, I foresee becoming more comfortable and familiar with the subtleties of structured-light 3D scanning. A workaround for blocked surfaces could be disassembling items to component parts or destructive breakdown to scannable pieces (waterjet anybody?).
Where there’s a will there’s a way. Custom fixtures (potentially 3D printed) and workflows can streamline the process for industry-specific applications.
Two ideas I am excited about are sculpting organic shapes out of clay and then digitizing them or scanning interestingly shaped surfaces found in other objects and scaling and using them for another application.
If you aren’t currently reverse engineering with enough regularity to justify ownership, it is still worth being aware of the current state of 3D scanning. As cost comes down, proliferation will go up and allow more potential for temporary access, service bureaus, or likelihood of finding a third-party model. As 3D printing has become democratized we have seen the explosion of design repositories like Thingiverse which are breeding grounds for creativity and solutions. Similarly, democratized 3D scanning will open up its own repositories, remixes, and newly discovered use cases and opportunities.
SolidSmack Verdict
How does the EinScan-SP 3D scanner stack up? We’re working on a new rating system here at SolidSmack, highly scientific-al, encompassing the vast knowledge of professional wisdom in the areas of design and industry. Yeah.
Rams Rating – 4.5
![]()
![]()
![]()
![]()

“Products have to be designed in a way that they are comprehensible”
– Dieter Rams, Design Superstar
Pong Rating – 4.5
![]()
![]()
![]()
![]()

“…easy to learn and difficult to master.”
– Nolan Bushnell, Atari Founder
Is it Cool?
Very. Seeing an item go back from reality to digital is more instantly gratifying then even 3D printing. It feels like the fabric of reality is getting ripped apart as molecules are sucked into the digital realm like in a 1980s science fiction movie. You may have an existential crisis about the nature of reality.
Is it Useful?
The price point, functionality, and ease of use are there. This scanner has tremendous utility as a design tool. If reverse engineering is something done with regularity, this tool could be the amazing results achieving, massive time saving, design game changer you need. It would not take many scans for it to pay for itself. There is no universal solution to all problem (except, of course, me) but the accessibility of this scanner can provide a solution to a problem where no decent solution existed before.
The EinScan-SP
The EinScan-SP is the top of the line scanner from Shining 3D that you see in the images and with the results shown above.
More Info: EinScan-SP
Resources: Specs
Price: $2599 (Amazon)
The EinScan-SE
The EinScan-SE has similar form, function and uses the same software but has a lower resolution and scanning speed.
More Info: EinScan-SE
Resources: Specs
Price: $1299 (Amazon)


This post features affiliate links which helps support SolidSmack through a small commission earned from the sale at no extra cost to you!


